
How to Disable Write Access to USB Hard Disk and Flash Key Drives
There is a registry hack that able to disable the USB drive access to USB mass storage device such as flash drive, USB key, thumb drive, pendrive and portable hard disk while keeping the USB hardware device such as webcam, mouse, keyboard, printer and scanner connected to USB ports working as usual. However, the hack disable the USB access to disk drive completely. User cannot copy data to the USB disk storage, nor able to read any files and documents from the USB drive.
For user who just want to disable write access to the external removable USB mass storage disk drive, there is another registry hack of WriteProtect in StorageDevicePolicies registry key that able to restrict Windows system from writing to the USB disk drive, and hence effectively user to copy any sensitive or private data from the PC to USB key stick. The trick works in a similar way to write-protect feature used in floppy disk and backup tape which make the disk read-only, only that in this case, it’s system wide implementation that block any writing and recording of data to USB mass storage device.
To disable writing access to USB drives and make all USB drives has only read-only access, follow these steps:
Run Registry Editor (regedit).
Navigate to the following registry key:
HKEY_LOCAL_MACHINE\SYSTEM\CurrentControlSet\Control
Create a New Key named as StorageDevicePolicies.
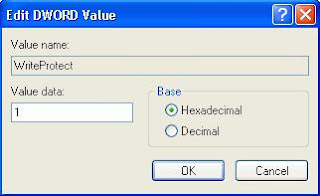
Highlight StorageDevicePolicies, and then create a New DWORD (32-bit) Value named as WriteProtect.
Double click on WriteProtect, and set its value data to 1.
Once set, all users on the computer is now blocked and prevented from copying, transferring or writing any files, documents and data to the USB disk drives, without the need to restart or reboot computer. Any attempt to download or copy files to USB drive will return the following error message:
The disk is write protected.
The media is write-protected.
Remove the write protection or use another disk.
To revert and remove the blocked write access to USB drivers, just delete the StorageDevicePolicies registry key, or delete the WriteProtect registry entry, or change the value data for WriteProtect to 0.
For user who doesn’t want to manually editing the registry, simply download the following registry registration files to enable or disable the write protection (block writing attempt) to USB removable drive. Double click the .reg file unpacked from the .zip archive to merge the registry key entries.
Download DisableWriteToUSB.reg
Download EnableWriteToUSB.reg
The trick works in Windows XP SP2 and SP3, Windows Vista, Windows Server 2003 and 2008.
For user who just want to disable write access to the external removable USB mass storage disk drive, there is another registry hack of WriteProtect in StorageDevicePolicies registry key that able to restrict Windows system from writing to the USB disk drive, and hence effectively user to copy any sensitive or private data from the PC to USB key stick. The trick works in a similar way to write-protect feature used in floppy disk and backup tape which make the disk read-only, only that in this case, it’s system wide implementation that block any writing and recording of data to USB mass storage device.
To disable writing access to USB drives and make all USB drives has only read-only access, follow these steps:
Run Registry Editor (regedit).
Navigate to the following registry key:
HKEY_LOCAL_MACHINE\SYSTEM\CurrentControlSet\Control
Create a New Key named as StorageDevicePolicies.
Highlight StorageDevicePolicies, and then create a New DWORD (32-bit) Value named as WriteProtect.
Double click on WriteProtect, and set its value data to 1.

Once set, all users on the computer is now blocked and prevented from copying, transferring or writing any files, documents and data to the USB disk drives, without the need to restart or reboot computer. Any attempt to download or copy files to USB drive will return the following error message:
The disk is write protected.
The media is write-protected.
Remove the write protection or use another disk.
To revert and remove the blocked write access to USB drivers, just delete the StorageDevicePolicies registry key, or delete the WriteProtect registry entry, or change the value data for WriteProtect to 0.
For user who doesn’t want to manually editing the registry, simply download the following registry registration files to enable or disable the write protection (block writing attempt) to USB removable drive. Double click the .reg file unpacked from the .zip archive to merge the registry key entries.
Download DisableWriteToUSB.reg
Download EnableWriteToUSB.reg
The trick works in Windows XP SP2 and SP3, Windows Vista, Windows Server 2003 and 2008.
Labels: Write Access To USB Drive
posted by Vinay Prasad | 8:05 AM
|
0 comments
![]()